Learn BrushVector
Everything you need to draw, rig and animate in your browser.
Getting started
BrushVector runs entirely in your browser. Nothing to install, no account or card needed. Open the app and a blank canvas is ready to draw, with the freehand pen already in hand. The free plan includes the full drawing, rigging and animation toolkit plus SVG, PNG and GIF export.
Your first five minutes
The fastest way to understand BrushVector is to make one small thing move:
- Create a shape. Drag on the canvas to sketch a closed shape, then just keep drawing. Each new stroke adds to it. Press A / D / I / E to switch between Add, Subtract, Intersect and Exclude as you go.
- Group and rig it. Select your artwork, switch to the Rig tool, and click along your shape to create bone joints. Each new bone connects to the previous one. Then Bind group to rig: your artwork is weighted to the bones automatically.
- Pose it. Drag the tip of the chain and the joints bend to reach it (that's IK, which stands for Inverse Kinematics). Switch to FK (Forward kinematics) mode and move a bone to swing its whole branch - Think of it more like posing a doll.
- Key two poses. Open the timeline, press Key to record the pose, move the playhead (the yellow line that shows you which frame you are viewing), pose again, key again. Press play.
- Make it wobble. Select a bone, open the Toolkit from the timeline bar and click Follow Through. Try setting it to loop mode and drag the sliders around while it plays live, then Bake when you find the right motion.
- Export. File ▸ Export animation…, choose GIF, and share what you made.
The interface
BrushVector keeps everything on one canvas — you switch tools, not apps.
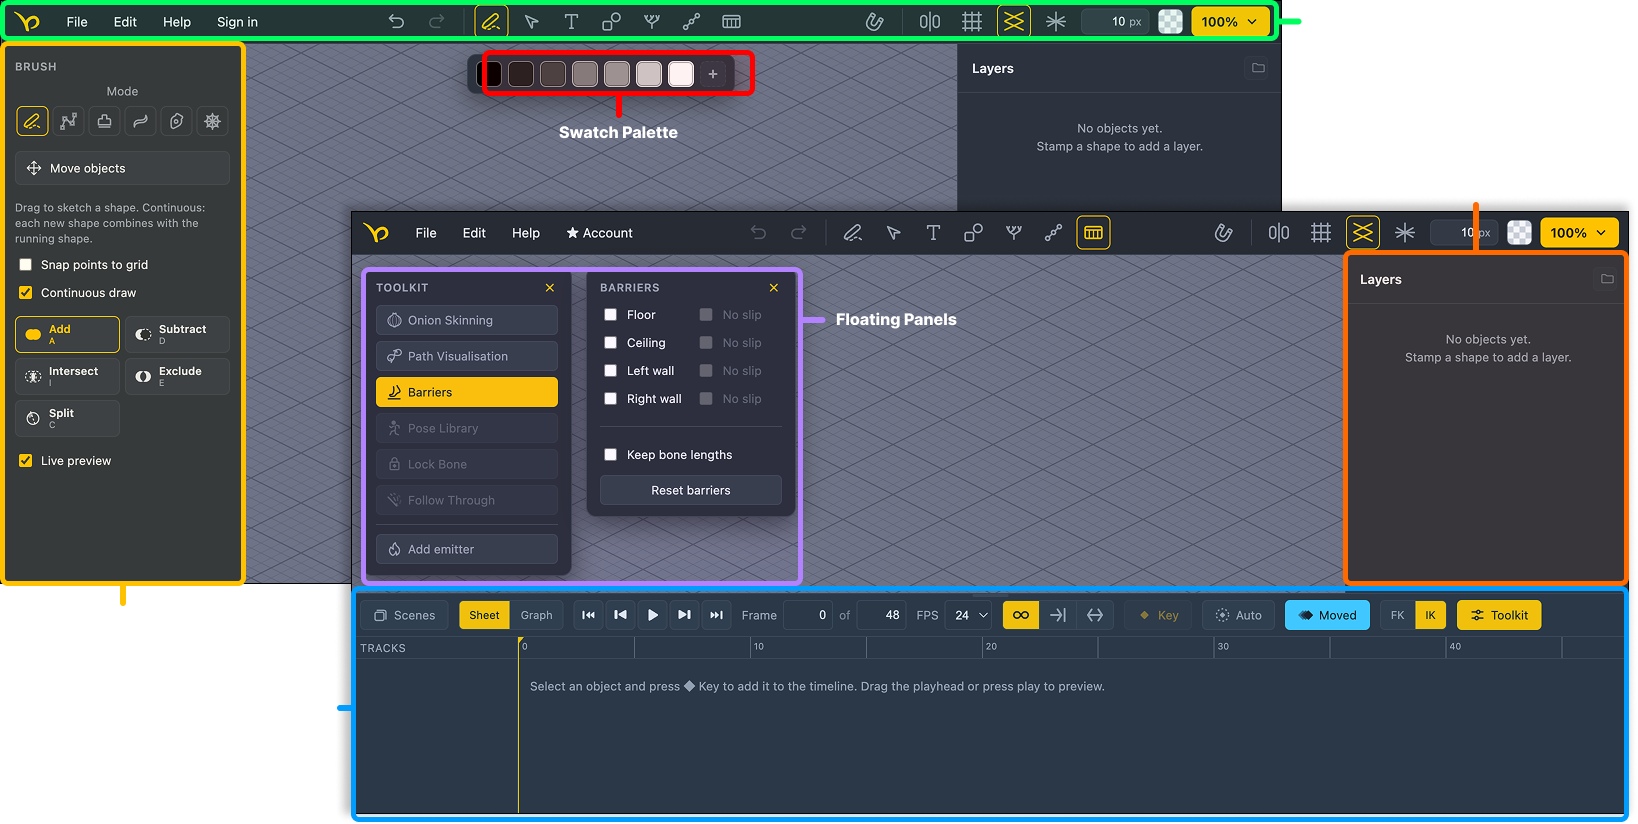
- Tool bar — Undo/Redo, Draw B, Select S, Text T, Shapes R, Trees F, Rigging J & Animation N.
- Canvas controls — Snap to Grid O, Mirror W, Grid Z, Isometric X, Perspective Y, grid size, background & gridline colours, and zoom level.
- Active tool panel — the active tool's panel docks to the left. In stamp-brush mode the shape library sits beside it as the stamp picker.
- Swatch palette — saved colours above the canvas. Click to apply, right-click to remove, + to open the colour picker and save a new one.
- Floating panels — selection actions, the animation Toolkit, Barriers and the Pose Library float over the canvas. All are draggable; Edit ▸ Reset panel positions puts them back.
- Layers, objects and folders — the layer list on the right, with show/hide, lock, reordering, folders, and (for rigged groups) the bone tree. Select two or more layers and group them into a folder with the group button at the top of the Layers panel or ⌘G; ⇧⌘G ungroups. Grouping items already inside a folder makes a sub-group.
- Animation timeline — opens along the bottom from the top bar. Closed, the app is a pure drawing tool.
The mental model is create vs. manipulate: the Draw tool creates new geometry; the Select tool moves, transforms, combines and edits what exists. A Move objects toggle (tap M, or hold it for a momentary move) lets you reposition things without leaving the draw tool, so your continuous-draw state is preserved.
Canvas, grids & symmetry
Artboards — start with an infinite canvas (export follows your content) or a fixed page, with presets for print (A3–A5, US Letter at 300 dpi), social (Instagram, X, YouTube) and screens (HD, 4K), in px or mm. Exports crop to the page and stay transparent.
Grids & snapping — square and isometric lattices with adjustable size, plus perspective guides. Object snap and point snap are independent; hold G to bypass snapping momentarily.
Symmetry — mirror/radial drawing with 1–24 axes and an optional reflect toggle, with live guides. Kaleidoscopic mandalas take about a minute.
View — zoom presets, Fit, scroll-to-zoom, and Space-drag to pan.
Drawing & carving
BrushVector's drawing is built around continuous-draw carving: you never stop drawing. With Continuous draw on (the default), every stroke boolean-combines into the same running shape — a silhouette emerges the way it would from a block of clay.
Carve operations
| Operation | Key | What it does |
|---|---|---|
| Add | A | New strokes merge into the shape. |
| Subtract | D | New strokes cut away — carve eyes, mouths and negative space directly. |
| Intersect | I | Keeps only the overlap between the stroke and the shape. |
| Exclude | E | Keeps everything except the overlap. |
| Split | C | Splits the running shape into two along your stroke. |
You can switch the operation mid-drag and the preview updates. Live preview shows the boolean result as you draw, with a faint ghost of the original shape so you can see what you're carving against. (On very complex shapes, turn it off for speed.)
The two pens
- Freehand pen 1 — drag to sketch a closed shape. Leaving the pen commits the running shape.
- Point-to-point pen 2 — click to drop anchors; drag while placing to pull out a Bézier curve. Double-click, Enter, or click the first point to close; right-click exits to Select.
Both pens share the same running shape and the same carve ops, so you can mix loose freehand strokes with precise point-by-point sections on one object. And carving isn't only for new shapes: select an existing layer (in the Layers panel, or before switching to a pen) and your strokes carve into that shape — add to it, subtract from it, keep sculpting. Press Esc to deselect and start fresh. Switching brush colour mid-session recolours the running shape, so you can settle on a colour as you carve.
Editing points
Double-click a shape (or use the Edit points toggle) to edit its path: drag square anchors to move, round handles to bend curves, double-click a point to convert a segment between line and curve, and double-click or Shift-click an edge to add a point. Delete removes selected points and bridges the path cleanly. Marquee-drag to grab many points at once.
Tip: block in the big silhouette first, then subtract detail — the same way you'd rough in a sculpt. Carving rewards working large-to-small.
The brush engine
The brush panel has six modes — the two pens plus four brushes, on keys 1–6 — and each remembers its own settings:
| Mode | Character |
|---|---|
| Pen 1 | Freehand drawing of plain vector paths — the carving workhorse (see Drawing & carving). The brush sliders hide for the pens. |
| Point-to-point 2 | Click-placed anchors and Bézier curves for precise shapes; shares the running carve shape with the pen. |
| Stamp 3 | Stamps any library shape along your stroke — spacing, scatter, follow-path chaining, and size/count/rotation jitter. Hold S while dragging to place a single stamp instead of a trail. |
| Ribbon 4 | Pressure-driven stroke with a round nib; a multi-colour palette sweeps a gradient along the stroke. |
| Calligraphy 5 | The ribbon engine with a broad angled nib — the Angle slider sets the nib angle. |
| Sketch 6 | Generative cross-hatching with line weight, reach, density and strand jitter. |
At the top of the panel is a shared colour palette: with two or more colours the brush walks the palette in order, Colour-jitter breaks the sequence randomly, and Blend colours sweeps a smooth gradient through the palette along the stroke — following curves. Shared controls cover size, pressure→size, pressure→opacity, smoothing, taper, opacity, noise, roughen, and overlap handling. A live ghost cursor shows the true painted footprint, and [ ] resize on the fly.
Because strokes are vectors, everything stays crisp at any zoom and remains editable geometry — a brush stroke is a shape like any other, so you can carve it, rig it, or turn it back into a brush.
Selection & effects
Select any object or group and the Selection panel gives you opacity, blur, stroke, gradients, blend modes and shaders — all non-destructive, all still vector.
Arrange — align, distribute and tidy from the floating toolbar; auto-layout groups (row/column with gap and alignment, like Figma auto-layout); frames with padding and clipping; skew, rotate ([ ] for ±15°), flip (H / V), duplicate (⌘D), and full boolean ops with hover preview from the Select tool.
Shaders
| Shader | Look |
|---|---|
| Pixel art | Blocky retro mosaic (with a square-pixel toggle) — pairs beautifully with sprite-sheet export. |
| Cel / poster | Flat colour banding for a cartoon/anime read. |
| Painterly | Brushy turbulence warp. |
| Ink outline | Dark silhouette contour. |
| Duotone | Two-colour luminance map. |
| Chromatic | RGB-split colour fringing. |
Shaders are built from SVG filter primitives, so they render live and export losslessly to SVG. Each has an Amount slider and works on a layer or a whole group.
Colour
Gradient maps repaint a selection's entire palette in one move. The gradient editor does linear, radial and conic fills — on fills or strokes — with a multi-stop editor and draggable on-canvas handles, all pure vector. The full set of blend modes (Multiply through Luminosity) previews live on hover. And the 3D light colour picker lets you choose colours on a lit, raymarched preview scene with adjustable key, fill and rim lights — so you pick colours the way they'll actually read.
Text
The Text tool T places editable vector type with a searchable font picker (a 12-family bundled library, plus on-demand Google Fonts on hosted builds). Load your own .ttf for the session. Controls cover weight, size, line height, letter-spacing and alignment; Convert to outlines bakes text into an editable shape you can carve and rig like anything else.
Shapes & the library
Standard shapes — drag out parametric primitives that stay editable afterwards: rectangle (with corner radius), ellipse, polygon/star (adjustable sides and star depth), heart, and line. Lines go deep: thickness, start/end caps (arrows, circles, diamonds and more), tapers, dashed/dotted styles, and a stamp style that repeats library shapes along the line. Double-click a line to edit it as a multi-point centreline with per-point thickness, so it can swell and taper along its length.
Shape library — a categorised library with search and pagination lives in the left panel. Stamp shapes onto the canvas by picking and clicking, and save anything you've drawn back into a named category with Add to shape set. Any library shape can also become a brush stamp or a particle.
Fractal trees
The Tree tool F grows fractal trees you can art-direct: generate a tree, edit its spine, and shape the branching until it reads right — then treat it like any other artwork.
- Editable skeleton — convert a tree into an editable branch skeleton and adjust individual branches; Reset takes it back to the generated form.
- The branches are a rig — grab branch joints directly in animation mode and key them, or convert the branches into a bone armature rooted at the trunk for the full rigging toolset. Follow-through on a swaying branch is a one-click breeze.
Available on desktop and tablet.
Bone rigging
Rigging turns a drawing into a puppet. Select a group, switch to the Rig tool, and click on the canvas to drop bone joints — each links to the last, and clicking an existing joint branches a new bone from it. Then Bind group to rig: every member of the group is weighted to nearby bones, so posing bends the artwork smoothly.
Posing
- IK (inverse kinematics) — drag the tip of a chain and the joints auto-bend to reach it, with bone lengths preserved. Best for planted feet and reaching hands.
- FK (forward kinematics) — drag a joint to swing its whole sub-branch, like jointing a limb. An FK mode picker chooses whether a drag rotates the bone, stretches it, or both.
- Bend stops — cap how far a joint can rotate, like an elbow that can't hyperextend: pick a joint and drag its two boundary handles. Enforced in both FK and IK.
- Lock bone — pin a bone so it holds while you pose the rest (plant a foot, fix a hand). Locked bones show in blue.
- Stretchy bones — let a bone stretch freely for tails, tongues and squash-and-stretch. Shown dashed.
Grow the rig as you go
You don't plan a skeleton up front. Add joints to rig keeps dropping bones onto an already-bound armature, and Add selected art to rig folds newly-drawn objects in, auto-weighted to the nearest bones — existing bones, members and painted weights are all preserved. Draw a character piece by piece and rig it as it grows.
Bones appear in the Layers panel as a nested tree mirroring the hierarchy — double-click to rename them (Shoulder, Elbow, Wrist…), click to jump to that joint. The rig saves with the file and survives undo/redo: reopen a project and the armature, weights, names and bend stops are all there.
Weight painting
Weights control how much each bone influences each part of the artwork — the difference between a stiff joint and a smooth one. Switch the rig panel to Weights mode: the artwork shows a live heatmap of the selected bone's influence (red = strong, blue = none). Drag on the canvas to paint influence up (Add) or down (Reduce), with adjustable brush radius and strength, or use Smooth to average and normalise the transition between bones — the quickest fix for a joint that bends badly.
Tip: pose the joint while you paint — put the elbow in its worst bend, then smooth the weights until it looks right. You're painting for the poses, not the rest state.
The timeline
Open the timeline from the top bar. Animation in BrushVector is pose-to-pose: select an object (or a rigged group), put the playhead where you want, and press Key to record position, scale, rotation, opacity and visibility at that frame. Add keys at other frames and press play.
The timeline bar runs: Scenes · Sheet|Graph view · transport · Frame x of y · FPS · playback mode (Loop / Once / Ping-pong) · Key / Auto / key scope · FK|IK · Toolkit. The Toolkit is a floating panel holding the occasional-use tools — Onion Skinning, Path Visualisation, Barriers, Pose Library, Follow Through and Add emitter — so the bar stays lean. Every floating panel is draggable, and Edit ▸ Reset panel positions puts them all back.
The essentials
- Auto-key — turn on Auto and every move, pose, or slider change records itself at the playhead. The first touch of a property also drops a key at frame 0 holding the original value, so a single edit already plays back as motion.
- Dopesheet — every animated object gets a track of keyframe diamonds: click to select, drag to retime, expand into per-property rows (Position X/Y, Scale, Rotation, Opacity, Visible). Box-select keys, copy/paste with ⌘C/⌘V, and hold Alt while dragging to stretch or squash timing proportionally.
- Easing — per keyframe: Linear, Ease, or Hold. The Smooth button eases every key on the selection in one click — the instant fix for robotic playback. Cyclic matches last frame to first and smooths the join for pop-free loops.
- Graph editor — switch from Sheet to Graph to shape each property as a value curve with draggable points and tangent handles.
- Stepped animation — the Steps menu converts motion to hand-drawn "on ones / twos / threes" for a stop-frame look; Preview auditions it without changing your keys.
- Onion skinning — Onion Skinning (in the Toolkit) ghosts surrounding frames (warm behind, cool ahead, fading with distance), with Before/After fields for how many ghost frames to show.
- Motion paths — Path Visualisation (in the Toolkit) draws an object's whole-timeline trajectory on the canvas. Keyframes are draggable anchors with Bézier handles, per-frame dots show spacing and speed, and a rotation spoke sets facing. Works on bones too: see a tail tip's full arc and re-pose by dragging the path itself.
- Named scenes — keep several animations in one file (Idle, Walk, Jump…), each with its own keys, length, FPS and playback mode. Open the Scene panel with the Scenes toggle at the start of the timeline bar.
Animating a rig
Select the rigged group with the timeline open and its bones appear alongside the normal handles — pose and key without switching tools. An FK/IK toggle sits on the bar and Lock Bone in the Toolkit pins a bone while you pose the rest. The Moved / All toggle controls key scope: in Moved (default), only the bones you actually posed get keyed, so refining one limb doesn't freeze the rest of the rig; All snapshots the whole pose for blocking. You can also pick bones straight from the Layers panel while animating.
Follow-through
BrushVector's signature trick: overlapping action — the drag, whip and settle of tails, ears, antennae and cloth — is generated for you, driven by the motion you've already animated.
- Animate the main action on the rig (a swing, a hop, a turn).
- Select a bone and click Follow Through in the Toolkit. Pick a preset — Tail, Antenna, Cloth, Rope, Bouncy, or Subtle.
- Dial in Stiffness/Force, Damping, Gravity and Bounce — the result plays live on the canvas as you drag the sliders.
- Use End at to confine the wobble to a segment of the chain, and tick Looping animation for seamless cycles — the simulation is pre-settled so there's no pop at the loop point.
- Hit Bake — the result is written as a handful of smooth keyframes you can still hand-tweak.
The motion cascades down the chain: each bone lags a little more than its parent, so the tip trails and whips, and gravity makes it droop. It's the difference between animation that moves and animation that feels alive — for free.
Barriers & constraints
- Barriers — open Barriers from the Toolkit and switch on a floor, ceiling, and left/right walls independently. Rigged bones can't cross them: feet stay planted, heads duck, characters press into corners. Drag to reposition (keyframable — rising platforms, stairs), tilt into ramps, and use per-barrier No-slip so a landed foot sticks instead of sliding. Keep bone lengths makes limbs rotate to meet the line rather than compress.
- Look-at constraint — make a bone (a head, the eyes) keep pointing at a draggable target locator. The locator is keyframable, so a head can track a ball or watch a character walk past — evaluated live every frame, straight into the export.
- Bone colliders — mark a bone as a solid capsule other bones can't pass through: limbs stop intersecting the body, a tail can't sweep through a leg. Applies while posing, in playback, and in export.
Pose library & lip sync
Open the Pose Library from the Toolkit — a floating, draggable panel that stays open while you animate. Set Pose captures the current pose (bones, plus member and folder visibility) and asks for a name; click a tile's name any time to rename it. Selecting a tile previews the pose live on the canvas; click again or change selection to revert.
Two ways to use a pose: Apply is a pure live override — it never writes a keyframe, perfect for setting up a starting pose. Apply & Key (or double-click) applies the pose and keys only the properties that actually changed, so unchanged bones stay free to move. Poses persist across documents, and rig poses are shared with any rig that has the same bone count — build a mouth-shape set once, reuse it on every character.
That makes lip sync a clicking exercise: save a mouth shape per phoneme, then step through the dialogue applying and keying shapes as you go. The same trick powers walk-cycle contact poses, hand shapes and expression sheets.
Particle emitters
In animation mode, Add emitter (at the bottom of the Toolkit) drops an emitter that spits out copies of any shape from your library — sparks, snow, confetti, smoke, fire, magic. Controls cover stream or burst mode, speed, angle and spread, gravity, life, size over life, spin (with a Right / Left / Both direction), fade, and colour — including a gradient-over-lifetime ramp each particle fades through as it ages (embers that go white → orange → smoke); hit Edit on the ramp to open its colour-stops panel.
- Attach to a bone and the emitter rides the rig — a torch flame stays in the hand; tick Aim with bone to fire particles where the bone points (spells, jet thrust).
- Loop seamlessly pre-fills the stream and makes it periodic, so the last frame matches the first.
- Emitters are keyframable like objects — position, opacity, scale, rotation, visibility — and can carry shaders, strokes, or a single clean emitter outline around the whole field.
- The simulation is fully deterministic and frame-exact, so every export reproduces identically.
Saving your work
Your work is yours, on your machine. Projects save as local .vect files — ⌘S quick-saves to the same file (with a native save dialog on Chromium browsers, falling back to Downloads elsewhere). Everything travels with the file: artwork, brushes used, the rig, painted weights, bone names, bend stops, scenes and keyframes.
Autosave keeps your last session in browser storage and restores it when you come back — but browser storage is a convenience, not an archive: save a .vect file for anything you care about, since clearing site data clears the autosave with it.
You can import SVG shapes, and open legacy .json projects.
Exporting
| Format | Best for | Plan |
|---|---|---|
| SVG | Crisp vector stills — shaders export losslessly as SVG filters | Free |
| PNG | Raster stills with transparency; fixed pages export cropped to the artboard | Free |
| GIF | Shareable loops; transparent by default, with a pad-to-square option for Discord/Slack emoji | Free |
| WebM video | High-quality video (Chromium browsers) | Pro |
| MP4 video | Video for editing and social | Pro |
| Sprite sheet | Game engines — a packed PNG grid plus a JSON sidecar with frame coordinates and fps | Pro |
| TexturePacker | Sheet + JSON (Hash) sidecar for Phaser, PixiJS and TexturePacker pipelines | Pro |
| Aseprite | Sheet + JSON sidecar with frame timings — import via Aseprite ▸ Import Sprite Sheet; pair with the Pixel shader | Pro |
| PNG frame sequence | Lossless individual frames, zipped, for compositing | Pro |
| Lottie | Lightweight animation for apps and the web — image-sequence or vector (see note below) | Pro |
| CSS animation | A self-contained HTML flipbook that plays in any browser | Pro |
Export animation (File menu — greyed out until you've keyed at least one frame) renders the timeline with a frame range, step, scale, FPS and optional background. Rig deformation, constraints, follow-through and particles are captured faithfully in every frame-rendered format. Choosing Sprite sheet opens the sprite-sheet studio right in the dialog — a live preview of the packed sheet while you tune columns, padding, scale and power-of-two sizing.
Lottie note: Lottie exports come in two flavours. Image sequence is faithful for everything — rigs, particles, shaders. Vector produces true lightweight Lottie shapes, but animates whole-object transforms only: per-frame rig/mesh deformation, particles and gradients aren't representable, so it's best for shape-and-transform scenes (the export tells you if something won't carry).
GIF note: GIFs are limited to 256 colours with on/off transparency (that's the format, not BrushVector) — set a solid background for clean edges on gradients and soft shapes.
Keyboard shortcuts
Most single-key shortcuts are editable in Edit ▸ Keyboard shortcuts — click a shortcut, press a new key, and it's saved. The editor refuses clashes and can reset to defaults. These are the defaults:
The tools: Undo · Redo · B Draw · S Select · T Text · R Shapes · F Tree · J Rig · N Timeline
Canvas toggles: O Snap · W Mirror · Z Grid · X Isometric · Y Perspective — beside the grid size, background and zoom controls
| Action | Shortcut |
|---|---|
| Select / Draw / Text tool | S / B / T |
| Shapes / Tree / Rig tool | R / F / J |
| Timeline / Layers panel — show or hide | N / L |
| Toggle: Snap / Mirror / Grid / Isometric / Perspective | O / W / Z / X / Y |
| Carve op: Add / Subtract / Intersect / Exclude / Split | A / D / I / E / C |
| Eyedropper — sample a colour from the scene | K |
| Move objects (tap toggles, hold is momentary) | M |
| Brush size − / + (rotate ∓15° outside the brush) | [ / ] |
| Flip horizontal / vertical | H / V |
| Bypass grid snapping (hold) | G |
| Brush panel modes: Pen / Point-to-point / Stamp / Ribbon / Calligraphy / Sketch (in the draw tool) | 1–6 |
| Nudge selection (objects, bones, emitters) | Arrow keys, Shift+arrows for one gridline |
| Copy / paste objects | ⌘C / ⌘V |
| Undo / Redo | ⌘Z / ⇧⌘Z (also buttons on the toolbar) |
| Duplicate / Save / Delete | ⌘D / ⌘S / Del |
| Group / Ungroup selection | ⌘G / ⇧⌘G |
| Deselect, then cancel/reset | Esc |
| Pan canvas (hold) | Space |
| Edit points on a shape | Double-click it |
| Timeline: copy / paste / select-all keys | ⌘C / ⌘V / ⌘A |
On Windows and Linux, use Ctrl where ⌘ is shown.
FAQ
What happens to my work if BrushVector shuts down?
Your projects live as .vect files on your computer, not on our servers — and your output exports to open formats (SVG, PNG, GIF, video, sprite sheets). If BrushVector vanished tomorrow, every file you've saved and everything you've exported would still be sitting on your disk. The .vect format is plain JSON, so nothing you make is locked to us. And per our terms, if we ever discontinued BrushVector we'd give reasonable notice first — but because your work is local, it stays yours either way.
Does BrushVector work offline?
Not currently. BrushVector loads from the web, so you need a connection to open it — there's no installable or offline mode today. Once the app is open, though, your work is kept locally: it autosaves in your browser and you can save .vect project files straight to your disk, so a dropped connection won't cost you your drawing.
Which browsers are supported?
BrushVector runs in modern browsers. Chromium-based browsers (Chrome, Edge, Arc, Brave) get the best experience — native file-save dialogs, a pixel-perfect eyedropper, and the full video export set (WebM and MP4). Firefox and Safari run the full editor too; the Chromium-only extras fall back gracefully — saving goes to your Downloads folder rather than a folder picker, and some video export formats may be unavailable. On iPad it works in Safari with touch and Apple Pencil pressure; the narrow phone layout hides rigging and animation, but tablets get the full toolset.
Can I use what I make commercially?
Yes. Everything you create in BrushVector is yours on every plan, including Free — use it commercially with no restrictions and no attribution required. The built-in assets (brushes, templates and presets) are free to use in your work too. See the terms.
Can I import existing artwork?
SVG import is built in — File ▸ Import SVG to canvas brings artwork from Illustrator, Affinity, Figma or Inkscape in as one editable object per element, with fills and opacity preserved (grouped and selected, ready to carve, rig and animate). Stroke-outlined icons import correctly too — strokes are baked into clean filled outlines, including dashes and caps.
Why does my GIF have rough edges?
GIF only supports on/off transparency, so soft edges and gradients get hard cutoffs. Set a solid background colour in the export dialog, or use WebM/MP4 for smooth alpha.
Plans & billing
The Free plan is the full creative toolkit — drawing, brushes, rigging, animation — with SVG, PNG and GIF export. Pro (£15/month) unlocks the full export suite, and the price falls by £3 every year you stay: £12 in year two, £9 in year three, down to free from year six. Cancel anytime — we remember how long you've been with us, so your loyalty pricing is preserved if you come back. The Lifetime licence (£299 once) includes all Pro features and every future update.
Cancel from the Account menu in the app. Every purchase has a 14-day, no-questions-asked refund — see the refund policy. Anything else: support@brushvector.com.